Museum lighting at home can make a private collection look extraordinary, but the wrong setup can fade pigments, flatten color and create glare. High-CRI LEDs with controlled beam angles and low-UV illumination help preserve visual depth and limit heat exposure.
This collector’s guide applies museum lighting design principles to fixture selection, installation, security and climate control. It explains how to create studio lighting at home without making artwork feel like part of a stage set, while adapting practical music room lighting ideas to view pieces. A 30-degree angle gives collectors a strong starting point to build a gallery that protects artwork and presents it beautifully.
Step 1: Plan Your Home Gallery and Installation
"There are two key considerations when it comes to displaying art to its best advantage: placement and lighting. You want to place art in a space that will accommodate it, leaving space around the art so it doesn’t feel crowded. Ideally, the art will be displayed at about eye level. We typically hang art so that the center-line of the art is 60″ above the floor. but this height can be modified based on personal preference. Lighting is critical. We recommend a warm or neutral LED spotlight shining on the art from above, at least 36 inches back from the art, and far enough above to allow the entire image to be illuminated evenly by the light." — Xanadu Gallery, Art gallery
Step 2: Choose Fixtures Using Museum Lighting Design Principles
Fixture choice determines whether a gallery wall looks balanced or suffers from glare, harsh contrast, and uneven color. Once the room plan identifies each work and its viewing position, the collector can choose museum-quality home lighting that matches the collection’s fixture needs, LED quality, beam geometry, and controls.
Track lights, picture lights, and adjustable recessed lights
Track lights work well for collections that rotate or include artwork in different sizes. Each head can be aimed independently, and the collector can move it along the track when a new work replaces an existing piece. Directional track fixtures also hold their color temperature as they dim, which keeps viewing consistent at different light levels.
Picture lights mount on the frame or wall above an artwork. They suit stable collections when the fixture complements the frame. The fixture should generally measure one-half to three-quarters of the framed artwork’s width. A short picture light can leave the lower corners dim, while an oversized unit can distract from a smaller work.
Adjustable recessed fixtures keep the ceiling visually quiet and can work well in rooms with low ceilings. Their directional mechanisms allow precise aiming without visible tracks, although their location is harder to change after installation. Collectors who want studio-style lighting at home with a refined residential look may prefer adjustable recessed lighting for its clean architectural finish, while track lighting provides more flexibility.
High-CRI LEDs and color temperature tested with your artwork
Choose LEDs with a color rendering index, or CRI, of at least 90. CRI measures how faithfully a lamp renders a standard set of colors, and 100 is the highest score. To render reds accurately in paintings, textiles, and richly pigmented works, check the R9 value too. Museum guidance defines excellent LED quality as CRI of 90 or higher and R9 of 90 or higher. Good-quality light has a CRI of at least 90 with an R9 of 50 or above.
Color temperature describes white light’s apparent warmth or coolness and is measured in Kelvin. It does not measure color quality. One consistent color temperature throughout a gallery prevents noticeable differences between walls. A 3000 K LED is a practical starting point for most spaces, though some collections may look better under temperatures up to 5000 K after testing in the room.
Set up temporary fixtures or samples near the display wall, then compare each option during the hours when people will view the work. Compare pale passages with deep reds, blue shadows, and neutral backgrounds. The test will show whether a warmer or cooler appearance suits the work without clashing with nearby fixtures. Music room lighting can follow the same approach when artwork shares space with instruments: maintain one consistent color temperature instead of mixing lamp types.
Beam spread and dimming controls matched to the collection
Beam angle controls where light falls, while lumen output only indicates how much light a fixture produces. A narrow beam can create a bright center with dark edges. A wide beam can wash light over nearby walls and frames. Choose the beam based on the artwork’s dimensions and the fixture’s distance from the wall.
Narrow beams, usually 10 to 30 degrees, suit compact works or sculpture when controlled directional shadows help reveal form. Medium beams of about 30 to 50 degrees offer a useful starting range for small and medium framed paintings, including many vertical works. Panoramic, oversized, or multi-panel art needs beams of 60 degrees or wider to provide full coverage, though spill beyond the artwork will increase.
Specify dimmable LED fixtures with compatible dimmers. Standard dimmers do not work with every LED. Dimming lets the collector reduce intensity to protect sensitive works, balance artwork lighting with the room, and adjust the presentation at night. Compare each fixture’s beam across a full-size sample area before making a final choice instead of selecting it by bulb brightness alone.
Step 3: Install and Aim Your Art Lighting

Image Source: SplitShire
Installation turns a fixture plan into usable museum lighting at home. Keep the sequence controlled: protect the collection first, complete the electrical work, then aim and measure each beam from the places where viewers stand or sit.
Protect or move artwork before installation begins
Remove artwork from the installation area before ceiling drilling, track mounting, or wall work starts. Cover any large piece that cannot be moved, and keep it outside the electrician's immediate work area. Keep frames, glazing, and finished wall surfaces available for inspection later.
Return one artwork at a time once installation is complete. This helps the collector identify the fixture assigned to each piece and prevents overlapping beams from causing confusion during adjustments.
Have a licensed electrician install wiring, tracks, and controls
A licensed electrician should install new wiring, ceiling tracks, recessed fixtures, and hardwired dimming controls. The electrician can place equipment according to the approved ceiling layout, secure it properly, and confirm that the controls work as intended.
Ask the electrician to energize the system before returning artwork to the walls. Test each circuit and dimmer independently. Separate ambient and art-lighting controls give the collector a more precise answer to how to get studio lighting at home because they can reduce room illumination without changing the display beam.
Start near 30 degrees from vertical and adjust for glare
Use a 30-degree angle from vertical as the original aiming position. This angle often balances reflection and shadow with track heads, recessed downlights, and picture lights. The fixture should begin about 27 inches from the wall for a 48-inch-high work, based on the 30-degree placement formula.
Check the result from the usual doorway, seating position, and standing distance. Glass, acrylic, and glossy paint can reflect the lamp into a viewer's sightline, while textured paint or deep frames can create unwanted shadows. Adjust the fixture in small increments and reassess it from the viewing position instead of directly beneath the light.
Check beam coverage for dark edges, frame shadows, and hot spots
Assess the entire artwork, including its corners and frame edges. A bright center with dim borders means the beam is too narrow or the fixture needs repositioning. A beam that spreads widely across surrounding walls may need tighter control.
Ceiling-mounted fixtures and wall-washer optics can distribute illumination more evenly across large canvases than a short picture light. A picture light for a broad framed work should measure at least half the frame’s width. Very tall works may require two overlapping sources aimed separately at the upper and lower areas to maintain even coverage.
Music room lighting ideas use the same practical test when framed art shares a performance space. Each work should remain visible without creating bright pools that compete with the room.
Measure light at the artwork rather than relying on bulb brightness
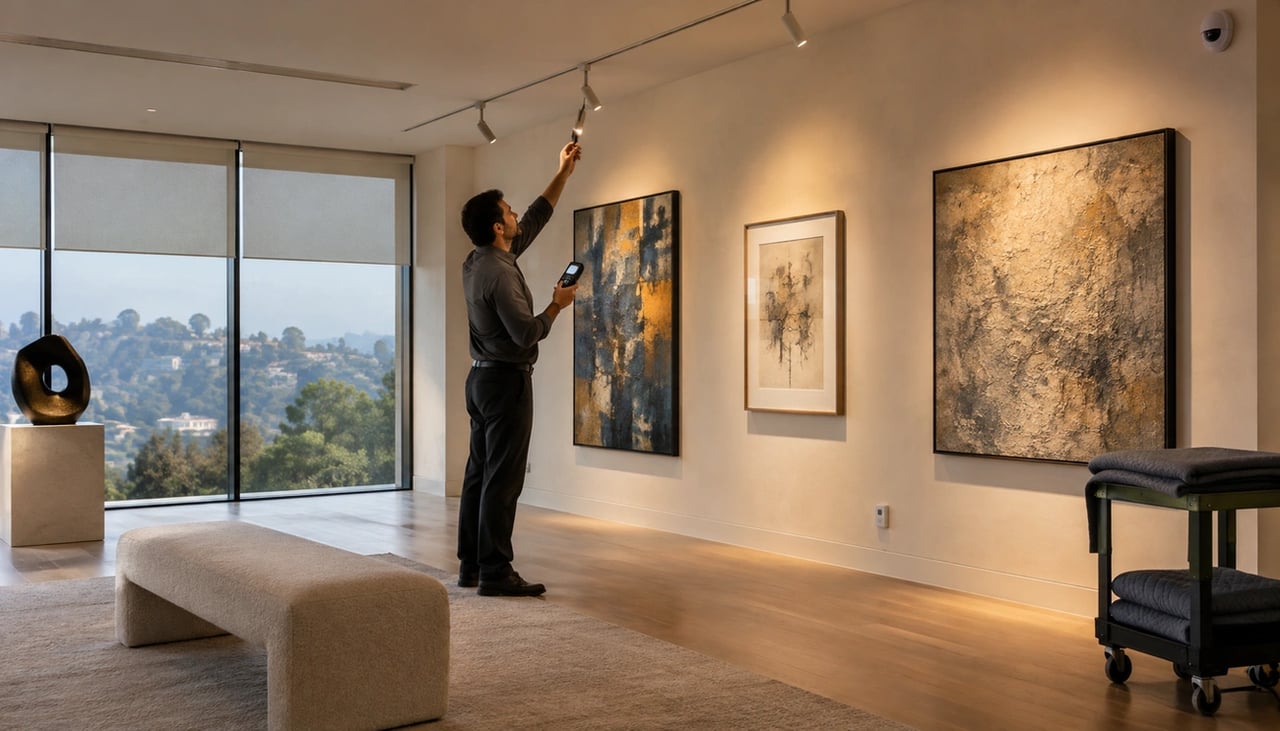
Lumens describe the source's output, not the illumination that reaches the artwork. Place a light meter close to the work at the same angle as its surface, then take several readings across large or unevenly lit pieces.
Record the results in lux. Sensitive materials, such as textiles, photographs, and works on paper, often use a 50-lux display target, while more reliable materials such as wood may use 250 lux. Dim, diffuse, or re-aim the fixture until the measured light is even across the artwork and appropriate for its material.
Step 4: Secure the Artwork and Gallery
Security starts where the frame meets the wall. Museum lighting for home can present artwork clearly, while secure mounting and discreet monitoring keep each work stable without changing the room's private character.
Choose wall fixings and locking hangers rated for the artwork and wall
Weigh the framed artwork first and identify the wall construction: drywall, plaster, brick, concrete, or wood. Select hardware rated 25% to 50% above the artwork's actual weight. This allows for movement during handling and reduces strain on the fixing.
Drywall installations are strongest when screws attach to a stud. If the preferred location sits between studs, use metal molly bolts or toggle bolts for works weighing 20 to 50 pounds. Heavier or wider frames need a French cleat that spans multiple studs. French cleats use two interlocking beveled bars. One attaches to the wall, and the other attaches to the frame, distributing the load instead of concentrating it at one point.
Use two mounting points for wide frames. They keep the work level, limit sway, and support predictable light aiming after installation. Masonry walls require masonry anchors or concrete screws. Plaster walls need hardware that engages the lath behind the surface.
A locking or retention-style hanger provides added protection where doors, foot traffic, or vibration could move a frame. Spring-equipped Tremor Hooks hold the D-ring or hanging wire in place and reduce the risk of a frame slipping off the hook. Adhesive strips work only for lightweight, low-risk pieces. They are not suitable for valuable framed art.
Place alarms and cameras without exposing private viewing areas
Object-specific monitoring can protect artwork without filling the gallery with visible hardware. Wireless active RFID tags can report movement, tampering, temperature, relative humidity, and light conditions for an individual asset. They then send encrypted information to security software for rule-based alerts. Place a tag behind a hanging work, while the related sensor remains nearby without touching the artwork.
Position cameras to cover entry routes, display walls, and vulnerable objects rather than seating areas or private conversations. Camera-based systems can create invisible protection zones around a work and alert the owner if someone crosses the defined boundary. These systems recorded 75 times more touches than guards observed alone and prevented more than 92% of object touches in museum settings.
Use a quiet alert for routine proximity events where visitors view the collection. Reserve audible alarms for repeated or high-risk intrusion. Angle cameras to verify an event, avoid reflections from glazing, and prevent direct views into adjoining private rooms. Concealed sensors and carefully framed cameras also preserve the restrained presentation created through museum lighting design and music room lighting ideas.
Step 5: Set Up Climate Control and Limit Light Exposure
"As we have gained greater control over our interior conditions, we are using microclimates less frequently, but they remain an essential aspect of certain galleries and are critical to the display of some objects." — Karen Gausch, Manager of exhibition production and collections care
Environmental stability keeps museum lighting at home within a safe operating range.
Set material-specific temperature and humidity targets with a conservator
A conservator should set conditions for each material. Mixed collections need a broad starting range of 16–22°C and 40%–70% RH, but stability takes priority. Paper often requires 40–50% RH, while photographs need 30–45% and canvas paintings need 40–60%.
Keep artwork away from vents, fireplaces, and direct sunlight
Place works on interior walls away from heating and cooling vents, active fireplaces, and direct sunlight. Direct airflow and localized heat can create damaging microclimates. Fireplace smoke and soot can also settle on surfaces. Use UV-filtering window film and keep shades closed during the brightest hours.
Place climate sensors near the collection and track changes
Install temperature and RH loggers that have been fine-tuned near representative works. Keep them away from vents, windows, doors, and heat sources. Continuous readings reveal local fluctuations that a room thermostat may miss. Review trend data with weather conditions, HVAC cycles, and visitor use.
Use shades, dimmers, and timers to reduce cumulative light exposure
Light damage builds over time and cannot be reversed. Set dimmers and timers so gallery lights operate only during viewing, and close shades before sunlight reaches the wall. Apply the same schedule to music room lighting ideas or studio lighting at home.
Step 6: Test, Document, and Maintain the System
Commissioning confirms that separate systems function as one private gallery instead of isolated equipment.
Check the gallery from seated and standing positions, day and night
The collector should enter, sit, stand, and move through the room in daylight and after dark. Viewers change position when they approach and analyze a work, and each path may reveal glare, blocked sightlines, or uneven beams. The collector should confirm that home museum lighting presents color accurately from the sofa and along the viewing route.
Test climate alerts, security alarms, and lighting schedules together
The collector should test the lighting schedule. They should trigger climate and security alerts, then verify that each notification identifies the correct room or object. Check camera views and confirm that timers dim or switch off fixtures when viewing ends. This connects museum lighting design with monitoring while keeping seating areas unobstructed.
Record settings and review them after artwork moves or seasonal changes
The collector should maintain records of wall locations; fixture settings; meter readings and viewing notes; camera coverage; and conservator targets. They should photograph the arrangement and retain records and certificates with the inventory. Review these details after a work moves, the collection expands, or seasonal HVAC behavior changes. Retest studio lighting at home and music room lighting ideas after layout changes.
Museum Lighting at Home: Neighborhood Blurbs
Bel Air
Bel Air’s larger estates can host a true gallery wing, and that is where museum-style lighting shines. Adjustable fixtures, dimmable controls, and a conservator-friendly layout let a collection be displayed without being overexposed. Christina Pope advises collectors to tour a property with lighting in mind: where does daylight land on the walls, is there room for track or recessed fixtures, and can the electrical be updated cleanly? When the architecture already respects the art, the lighting plan gets to be the finishing touch. Bel Air guide →
Beverly Hills
Beverly Hills is a natural setting for collectors who like to entertain around their art, and that makes lighting a design decision as well as a protective one. The goal is a display that looks luminous at a dinner party and gentle on the work the rest of the year. Christina Pope, with deep international experience in the Dubai luxury market, advises buyers to ask how a home handles layered lighting, separate controls for room and artwork, and window light on key walls. Great art deserves great lighting, and a great showing shouldn’t need a dimmer cheat sheet. Beverly Hills guide →
Hollywood Hills
Hollywood Hills homes are known for walls of glass and sweeping light, which is a gift for living and a challenge for art. The honest pivot is that daylight can be the strongest light source in the room, so a collector should check where sun lands and whether shades, film, or interior walls can protect sensitive pieces. Christina Pope advises touring at different times of day and looking for solid walls that can serve as a dedicated gallery. The best hillside homes let the view steal the show while the art sits happily out of the sun. Hollywood Hills guide →
Brentwood
Brentwood’s established homes often offer well-proportioned rooms and quiet interior walls, a good starting point for a considered display. For collectors, the questions are practical: can fixtures be added without disrupting the architecture, are ceilings and walls suited to tracks or recessed lights, and can the room’s lighting be controlled in layers? Christina Pope advises asking a lighting designer or electrician to review a home before purchase, so the plan is clear from day one. A calm room can make a collection feel even more considered. Brentwood guide →
Pacific Palisades
For many Pacific Palisades buyers, lighting a collection overlaps with rebuilding. That is an opportunity, since wiring, ceiling layouts, window placement, and climate control can be planned with a gallery in mind from the start. It also depends on each property’s permits and timeline, so Christina Pope advises collectors to bring their architect, lighting designer, and contractor into the conversation early. Designing for art from the blueprint is far easier than retrofitting, and far less likely to involve ladders. Pacific Palisades guide →
Hidden Hills
Hidden Hills is less about gallery culture and more about space, which can still suit a collector. The honest pivot is that larger floor plans often allow a dedicated room or wing for display, away from busy living areas and direct sun. Christina Pope advises buyers to look for a space where lighting, climate, and security can be planned together, and to confirm community guidelines before any exterior changes. Room to spare means a collection can breathe, and so can the buyer. Hidden Hills guide →
Malibu
Malibu’s light is beautiful and demanding. Bright ocean glare, large windows, and coastal air can all affect how art looks and how it ages, so a collector benefits from interior walls, shades, and sensible climate control. Christina Pope advises buyers to visit at different hours, notice where sun and reflections land, and ask how the home manages humidity and ventilation. The sunset is a spectacular backdrop for dinner, but a gallery wall usually prefers to stay out of it. Malibu guide →
Conclusion
Thoughtful planning can make museum lighting for home more than a visual upgrade. Collectors who assess artwork placement and room conditions, including daylight, power access, and viewing positions, can choose high-CRI LEDs, suitable beam angles, and dimming controls that showcase each piece without unnecessary exposure.
Secure mounting, discreet monitoring, and stable temperature and humidity also protect the collection after installation. Regular tests, meter readings, and seasonal reviews help lighting, climate, and security systems work together.
A well-designed home gallery should feel effortless to visitors. Precise installation and consistent care allow collectors to display art beautifully while protecting its value for years to come.
Key Takeaways
A home gallery succeeds when lighting, security, and environmental controls work together to present art beautifully and preserve it long term.
Plan around artwork, sightlines, daylight, power, and wall construction before buying fixtures or starting electrical work; build flexibility for future acquisitions.
Use high-CRI 90+ LEDs, test color temperature on-site, and match beam angles and dimmers to each artwork’s size, material, and sensitivity.
Begin aiming fixtures at 30 degrees from vertical, then measure illumination at the artwork in lux to eliminate glare, hot spots, and dark edges.
Secure art with wall-rated, locking hardware; position discreet cameras, alarms, and sensors to protect works without compromising private viewing spaces.
Prioritize stable, material-specific temperature and humidity; keep art away from sun, vents, and fireplaces, and limit cumulative exposure with shades, dimmers, and timers.
Test lighting, climate alerts, security, and schedules together; document settings and revisit them after artwork moves, collection changes, or seasonal HVAC shifts.
FAQs
Q1. What lighting works best for a home art gallery?
Choose dimmable LEDs with a color rendering index (CRI) of at least 90. Track lights suit changing collections, picture lights suit fixed displays, and adjustable recessed lights offer a discreet look.
Q2. How should I position lights to reduce glare on artwork?
Start by aiming lights at about 30 degrees from vertical. Adjust while checking the artwork from seated and standing positions, looking for reflections, frame shadows, and uneven coverage.
Q3. Is track lighting a good choice for rotating art displays?
Yes. Track heads can be moved and aimed independently to suit different artwork sizes and locations. Have a licensed electrician install the tracks, wiring, and hardwired controls.
Q4. How can I choose lighting that brings out my artwork’s colors?
Use high-CRI LEDs and test color temperatures beside the artwork. Around 3000 K is a practical starting point, but compare options in the room and keep the chosen color temperature consistent.
Q5. How bright should home gallery lighting be?
Measure illumination at the artwork with a lux meter rather than relying on bulb brightness. Sensitive works such as photographs, textiles, and paper commonly use a 50-lux target. Use dimmers and timers to limit exposure.